Fraser Plumbing | San Diego Plumbers (619) 332-0275

Plumbing Tips • San Diego

Tips to Install a New Toilet: A Step-by-Step Guide In San Diego

Installing a new toilet may seem like a daunting task, but with the right guidance, it can be a straightforward process.

Tips to Install a New Toilet: A Step-by-Step Guide In San Diego

Did you know that an average person spends about three years of their life on the toilet? That’s a significant amount of time, making it essential to have a properly functioning and comfortable one. Installing a new toilet may seem like a daunting task, but with the right guidance, it can be a straightforward process. From preparation and tools needed to step-by-step instructions, we’ve got you covered.

Step 1

Preparing for installation

Remove Old Toilet

To start the installation process, first remove the old toilet by shutting off the water supply valve. Next, disconnect the water supply line and remove the bolts securing the toilet to the floor. Lift the toilet carefully and set it aside.

Inspect Flange

Inspect the flange after removing the old toilet to ensure it is in good condition. Look for any signs of damage or corrosion that may affect the new toilet’s installation. If needed, repair or replace the flange before proceeding with the installation.

New Seal Installation

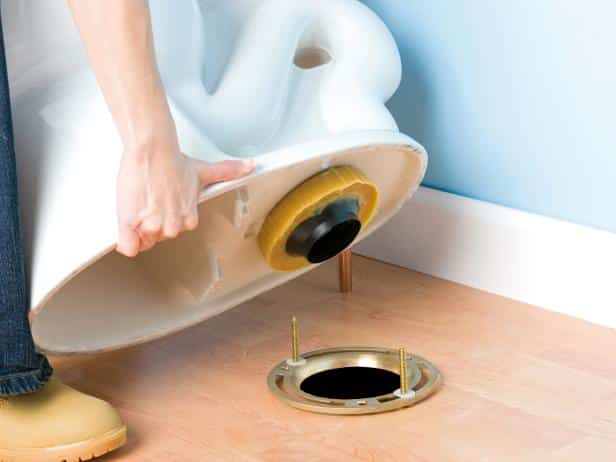
Install a new wax seal on the flange before placing the new toilet. Ensure the seal is properly aligned and secure to prevent leaks. Gently lower the new toilet onto the flange, aligning it with the bolts. Press down firmly to create a tight seal between the toilet and the flange.

Step 2

Setting up the new toilet

Place on Flange

To properly position the new toilet, carefully place it over the flange on the bathroom floor. Ensure that the wax ring is correctly aligned with the flange to prevent any leaks. Double-check the alignment before proceeding further.

When setting the toilet in place, make sure it sits securely on the flange without any wobbling. This step is crucial to prevent any instability or damages to the toilet and the surrounding flooring. Once positioned correctly, apply gentle pressure to set it firmly in its place.

Secure Bolting

After placing the toilet on the flange, securely bolt it down using bolts provided in the installation kit. Tighten the bolts evenly on both sides to ensure a balanced and stable fit. Avoid overtightening, as it can lead to cracks in the porcelain or damage to the flange.

To prevent any movement or rocking of the toilet, use a wrench to tighten the bolts securely. Check for any gaps between the base of the toilet and the floor, ensuring a snug and secure fit. This step is essential for maintaining the structural integrity of the toilet installation.

Tank Attachment

Attach the tank to the bowl by aligning the holes at the base of the tank with those on the bowl. Secure them together using bolts or screws provided in the tank assembly kit. Make sure to tighten them adequately to prevent any leaks or loosening over time.

To complete the installation process, connect the water supply line to the tank’s inlet valve. Ensure a tight connection to prevent any water leaks once the toilet is in use. Test the flush mechanism and check for any leaks before finishing up.

Step 3

Final touches

Seat Installation

To install the toilet seat, position it over the bowl and align the holes. Then, insert the bolts and tighten them securely. Next, snap on the bolt caps for a finished look.

When attaching the seat, ensure it’s centered and secure to prevent any wobbling. Tighten the bolts evenly to avoid imbalance or instability. Finally, test the seat by gently sitting on it.

Leak Testing

After completing the installation, conduct a leak test to ensure there are no water leaks. Add some food coloring into the tank and wait for about 30 minutes. If the water in the bowl changes color, there might be a leak.

Inspect all connections and joints for any signs of moisture. Check the base of the toilet, supply line, and tank for any water accumulation. Address any leaks promptly to prevent water damage.

Maintenance Tips

Maintenance tips

Regular Checks

Perform regular checks on your toilet to ensure it functions properly. Check for any leaks or unusual noises when flushing. Look for cracks in the porcelain or water pooling around the base.

Keep an eye on the water level in the tank and adjust the float if necessary. Inspect the flushing mechanism to see if it needs cleaning or replacing. Addressing these issues promptly can prevent costly repairs later on.

Seal Replacements

Over time, the seals in your toilet may wear out, leading to leaks and inefficiencies. Replace the wax ring under the toilet if you notice water seeping onto the floor. This simple fix can prevent water damage and mold growth.

Consider replacing the tank-to-bowl gasket if you spot water leaking from the base of the tank. A deteriorated gasket can cause water wastage and increase your utility bills. By replacing these seals, you can ensure your toilet operates efficiently.
DIY Troubleshooting

DIY troubleshooting

Common Issues

Toilets can face various common issues, such as clogging due to excessive toilet paper or foreign objects. Leaks around the base are often caused by a deteriorated wax ring. Running water is typically due to a faulty flapper valve or fill valve.

  • Clogging from excessive toilet paper or foreign objects
  • Leaks around the base due to a deteriorated wax ring
  • Running water caused by a faulty flapper valve or fill valve

Quick Fixes

When facing these common issues, there are quick fixes you can implement without professional help. Unclog a toilet by using a plunger or drain snake. To fix leaks, replace the wax ring and ensure proper sealing. For running water, adjust the flapper valve or replace the fill valve.

  • Unclog the toilet using a plunger or drain snake
  • Replace the wax ring to fix leaks and ensure proper sealing
  • Adjust the flapper valve or replace the fill valve for running water

FAQ

FAQs

Common questions about installing and maintaining a toilet.

Still have a question?

Talk to a Fraser plumber. We’re available 24/7.

To prepare for installing a new toilet, gather necessary tools, shut off the water supply, remove the old toilet, clean the area thoroughly, and ensure the floor is level before beginning installation.

To set up a new toilet, follow these steps: Install the wax ring and bolts, place the toilet over the flange, secure it in place, connect the water supply line, test for leaks, and finally, bolt down the toilet securely.

After installing a new toilet, caulk around the base for a watertight seal, check for any loose fittings or leaks, adjust the seat if needed, and ensure proper flushing and refilling of the tank before regular use.

Maintain your newly installed toilet by regularly cleaning it with non-abrasive cleaners, checking for leaks or running water, inspecting components like flapper valves or fill valves for wear, and addressing any issues promptly to prevent further damage.

For common toilet issues like clogging or weak flushing, try using a plunger first. If that doesn’t work, you can adjust the water level in the tank or inspect the flapper valve for proper sealing. Always refer to your toilet’s manual for specific troubleshooting guidance.

Please call Fraser Plumbing at (619) 332-0275 for any and all of your plumbing needs.

Conclusion

Give Fraser Plumbing Inc. a call right away to learn more about how our experts can help with leak detection in San Diego, CA.

Ready When You Are

Rather have a plumber install it?

Call us 24/7 or send a service request, and we’ll get a plumber to you.

Emergency plumbing, 24/7

Burst pipe, sewer backup or no hot water? We’re open every day, around the clock.

Service Request

Request plumbing service

Tell us what’s going on and we’ll get back to you.

Call 24/7

License #1106710

Licensed, bonded & insured

Schedule a service request

Fields marked * are required.

  • This field is for validation purposes and should be left unchanged.

Emergency? Call (619) 332-0275. We answer 24/7.